
The Ultimate Crawl Space Insulation DIY Roadmap for Homeowners
Why Your Crawl Space Could Be Costing You Hundreds Every Year
Insulating crawl space DIY is one of the highest-impact home improvement projects you can tackle on a weekend — and it doesn’t require a contractor.
Here’s the quick version of what you need to know:
- Inspect first — check for moisture, mold, pests, or standing water before touching any insulation
- Seal air leaks — caulk and spray foam around rim joists, pipes, and gaps
- Install a vapor barrier — lay 6-mil polyethylene sheeting over any dirt floor
- Add insulation — use rigid foam on walls (unvented) or fiberglass/rigid batts between floor joists (vented)
- Seal vents and access doors — if converting to an unvented (conditioned) crawl space
Now, why does this matter so much?
Picture this: it’s January, your heating system is running nonstop, and your floors still feel like ice. That’s not just bad insulation above — it’s cold, damp air rising from below.
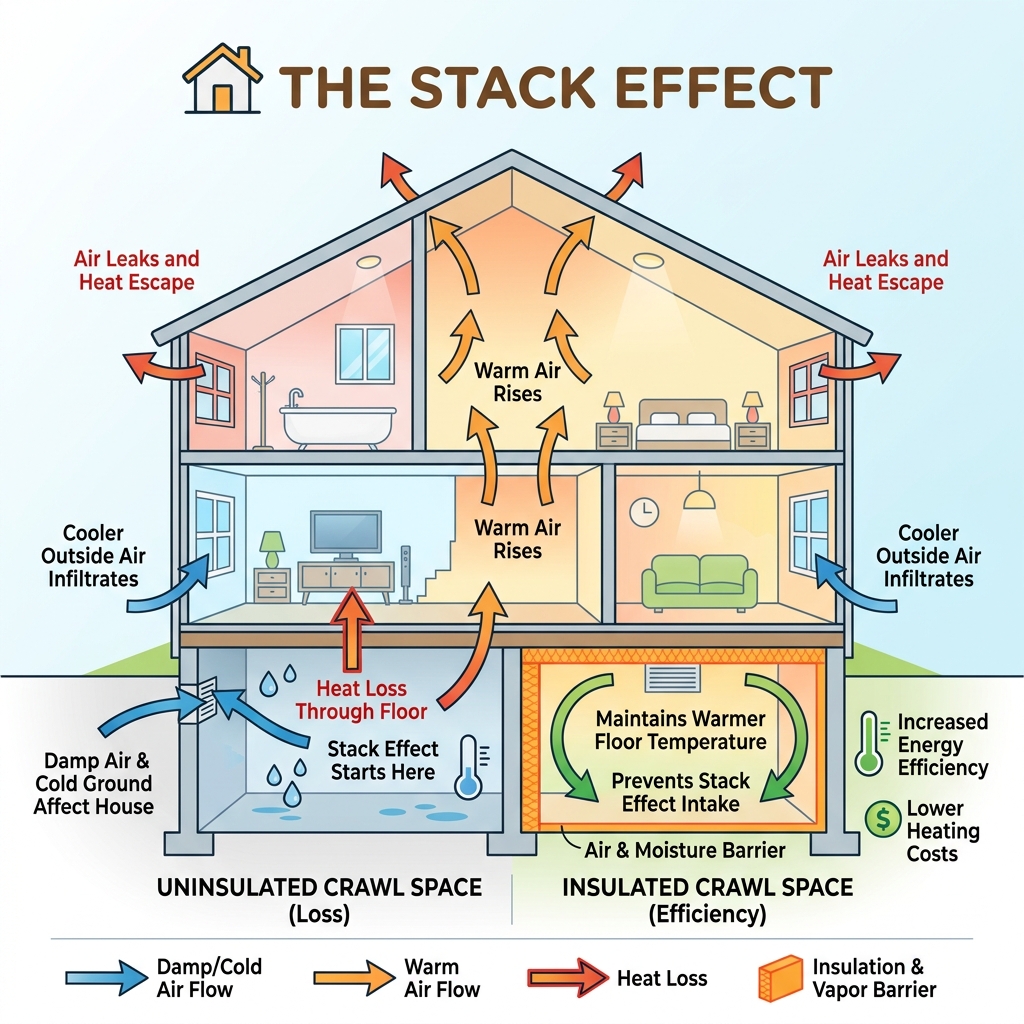
Uninsulated crawl spaces can allow 15–25% of your home’s heating and cooling energy to escape. And because warm air naturally rises from the bottom of a home to the top — a process called the stack effect — your crawl space is essentially the starting point of your home’s energy loss.
The good news? Fixing it yourself is very doable. Materials are affordable. The skills needed are basic. And the payoff — lower energy bills, warmer floors, and better air quality — starts immediately.
This guide walks you through every step: from choosing the right insulation type, to sealing moisture out, to finishing the job safely in a tight space.
Why Insulating Your Crawl Space is a Game-Changer
If you’ve ever wondered why your HVAC system seems to be fighting a losing battle, the answer might be right under your feet. We often focus on the attic or windows, but the crawl space is a massive thermal hole in many homes. By prioritizing insulating crawl space diy, you aren’t just saving money; you’re fundamentally changing how your home breathes.
Proper insulation acts as a thermal blanket. In the winter, it keeps the warmth from escaping through the floorboards; in the summer, it prevents the humid, heavy air of the earth from turning your home into a sauna. Beyond the thermostat, there are three major wins:
- Pipe Protection: Frozen pipes are a homeowner’s nightmare. Insulating the perimeter or the pipes themselves prevents costly bursts during a cold snap.
- Air Quality: Because of the stack effect, about 50% of the air you breathe on the first floor comes from the crawl space. If that space is damp and moldy, your indoor air quality suffers.
- Energy Savings: Industry data suggests that a well-insulated crawl space can save homeowners up to 15% on their annual heating and cooling bills.
To see how your current energy usage stacks up, we recommend checking out the Home Energy Yardstick. For a broader look at efficiency, see our guide on Insulating Your Home for Energy Efficiency.
The Financial Impact of Heat Loss
Heat moves in three ways: conduction (through materials), convection (through air), and radiation. In a crawl space, “thermal bridging” is the silent thief. This happens when heat bypasses your insulation through the wooden joists or concrete walls.
Research shows that heat loss through uninsulated foundation walls can account for up to one-third of the total heat loss in an average home. When you consider that the average American household spends over $2,000 annually on energy, the ROI for a DIY project becomes clear. Most homeowners find that the project pays for itself in energy savings within just 2 to 4 years. For more ways to keep your wallet fat and your house warm, check out these Energy Saving Methods for Home Insulation.
Vented vs. Unvented: Choosing Your Strategy
Before you buy a single roll of fiberglass, you have to make a big decision: Are you keeping your vents, or are you sealing the space up?
- Vented Crawl Spaces: Traditionally, these use vents to “breath” out moisture. In this setup, you insulate the ceiling (under the floorboards). This keeps the house warm but leaves the crawl space itself subject to outdoor temperatures.
- Unvented (Encapsulated) Crawl Spaces: Modern building science heavily favors this. You seal the vents and insulate the foundation walls. This turns the crawl space into a “conditioned” space, much like a mini-basement. It’s significantly better for moisture control and energy efficiency.
Your choice often depends on your climate. Check the IECC Climate Zone Map to see what the requirements are for your specific region. If you’re prepping for a harsh winter, our Catch the Heat Insulation Tips for Winter can help you decide which path to take.
When to Insulate the Ceiling vs. Walls
If you choose a vented system, you must insulate between the floor joists. However, be warned: fiberglass batts in a damp, vented crawl space often sag and become a hotel for mice.
If you choose an unvented system, you insulate the walls. This is generally the gold standard for 2025. It protects your plumbing (since the pipes are now inside the “warm” zone) and prevents the wood rot common in humid, vented spaces. Always check local building codes, as some areas require a specific amount of “makeup air” or a dehumidifier if you seal the vents completely.
Essential Materials and Tools for Insulating Crawl Space DIY
Success in a cramped space depends on having the right gear. You don’t want to crawl out five times because you forgot a utility knife.
The Department of Energy generally recommends a minimum of R-9 for crawl space walls, though colder climates may require up to R-30 for floor joists.
| Material | R-Value per Inch | DIY Cost (sq. ft.) | Best Use Case |
|---|---|---|---|
| Fiberglass Batts | 2.9 – 3.8 | $0.30 – $1.50 | Vented ceilings (Dry climates) |
| Rigid Foam Board | 3.6 – 6.5 | $0.50 – $2.00 | Foundation walls (Encapsulation) |
| Spray Foam (Closed-Cell) | 6.0 – 7.0 | $1.50 – $3.00 | Rim joists and hard-to-reach gaps |
| Mineral Wool | 3.0 – 3.3 | $0.80 – $1.60 | Fire resistance and soundproofing |
For a professional-grade result, follow the DOE’s Home Improvement Expert Checklists.
Choosing the Right Insulation Material
- Fiberglass Batts: The most common DIY choice because they are cheap. However, they absorb moisture. If your crawl space is even slightly damp, avoid these, or they will eventually grow mold and fall down.
- Rigid Foam Board: Made of polystyrene or polyisocyanurate, these are moisture-resistant and easy to cut. They are the “bread and butter” of insulating crawl space diy wall projects.
- Closed-Cell Spray Foam: This is the MVP for air sealing. It acts as both insulation and a vapor barrier. While large-scale applications are best left to pros, DIY “froth kits” are great for rim joists.
- Mineral Wool: Naturally pest-resistant and fireproof, this is a great alternative to fiberglass if you are insulating the ceiling.
Tools and Safety Gear Checklist
Working in a crawl space is literally “getting down and dirty.” You need protection from dust, mold spores, and fiberglass fibers.
The DIY Survival Kit:
- PPE: Safety glasses, a N95 or P100 dust mask, and a disposable Tyvek suit.
- Comfort: Heavy-duty kneepads are non-negotiable.
- Lighting: A high-lumen LED headlamp (don’t rely on a flashlight you have to hold).
- Cutting: A sharp utility knife and a straight edge.
- Sealing: A caulk gun and several cans of “Great Stuff” expanding foam.
Maintaining a healthy environment is key; read more at the EPA’s Indoor Air Quality for Homes.
Preparation: Moisture Control and Air Sealing
You should never insulate a “wet” problem. If you have standing water or a leaky pipe, fix those first. If you insulate over moisture, you are just building a mold factory.
Before you start, we highly recommend a radon test. Sealing a crawl space can sometimes trap radon gas, so check the EPA’s Consumer Guide to Radon Reduction to see if you need a mitigation system first. Once you’re cleared, start by learning How to Seal Air Leaks to Save Energy.
Addressing Dirt Floors and Vapor Barriers
If your crawl space has a dirt floor, it is constantly “exhaling” moisture into your home. You need a vapor barrier.
- Clear the debris: Remove rocks or sharp sticks that could puncture the plastic.
- Lay the plastic: Use 6-mil (or thicker) polyethylene sheeting.
- Overlap: Overlap all seams by at least 12 inches and seal them with heavy-duty waterproof tape.
- Go up the walls: Run the plastic 12 inches up the foundation walls and secure it with butyl tape or masonry fasteners.
This simple step can drop the humidity in your crawl space by 20-30% almost instantly.
Sealing Gaps and Rim Joists
The “rim joist” is where the wooden structure of your house meets the concrete foundation. It is notorious for air leaks.
- Small gaps: Use high-quality caulk.
- Large gaps: Use expanding spray foam around plumbing stacks, electrical wires, and the sill plate.
- The “Block” Method: Cut small squares of rigid foam to fit into the bays between joists at the rim, then “picture frame” them with spray foam to create an airtight seal.
For a deeper dive into these techniques, see The Ultimate Guide to Insulating Your Home.
The Installation Process: Walls, Floors, and Joists
Now for the main event. Whether you are going for the walls or the ceiling, the goal is a continuous thermal break.
Step-by-Step: Insulating Crawl Space DIY for Vented Areas
If you’ve decided to stay with a vented system, you’ll be working overhead.
- Measure and Cut: Cut your batts (fiberglass or mineral wool) about half an inch wider than the joist bay for a “friction fit.”
- Install: Push the insulation up between the joists. Do not compress it. Insulation works by trapping air; if you squish it, you lose the R-value.
- Vapor Barrier Orientation: If using “faced” insulation, the paper (vapor retarder) should almost always face the heated side of the house (upward).
- Secure: Use “lightning rods” (wire stays) or plastic strapping every 12-18 inches to keep the insulation from sagging over time.
Advanced Techniques: Insulating Crawl Space DIY for Unvented Walls
This is the preferred method for modern energy efficiency.
- Clean the walls: Brush off any loose dirt or efflorescence from the concrete or block walls.
- Apply Adhesive: Use a foam-compatible adhesive (like Loctite PL Premium) in vertical beads every 6 inches.
- Press and Fasten: Press the rigid foam panels (foil-facing out) against the wall. For extra security, use masonry “button” fasteners.
- Stagger Seams: If you are doing two layers, stagger the seams so they don’t overlap.
- Seal the Joints: Use foil tape or spray foam on every single seam between the foam boards.
Expert Tip: Leave a 2-inch “termite inspection strip” of bare concrete at the very top of the wall if required by your local code.
Maintenance, Safety, and Long-Term ROI
Once the job is done, don’t just forget about it. We recommend an annual “Crawl Space Date.” Every fall, grab your headlamp and head down there to check for:
- Sagging: Is any insulation falling down?
- Moisture: Is the vapor barrier holding water, or are there new leaks?
- Pests: Are there signs of rodents or termites?
- Humidity: Keep a cheap digital hygrometer in the space. You want the relative humidity (RH) between 30% and 50%. If it’s consistently above 60%, you may need a dedicated crawl space dehumidifier.
For more maintenance tips that save you money, look at Attic Insulation Tips Save Energy and Money.
Common DIY Mistakes to Avoid
- Compressing the Insulation: We’ve said it once, but it bears repeating. Squished insulation is just expensive trash.
- Ignoring the Rim Joist: If you insulate the walls but skip the rim joist, you’re leaving the front door open while the windows are shut.
- Blocking Vents in a Vented System: If you choose to keep your crawl space vented, do not accidentally stuff insulation into the vent openings. This traps moisture and leads to rot.
- Skipping the Air Seal: Insulation stops heat flow, but it doesn’t stop air flow. You must use caulk or foam to stop the drafts before you put up the batts.
Frequently Asked Questions about Crawl Space Insulation
What is the best R-value for crawl space insulation?
The Department of Energy recommends at least R-9 for walls in most zones, but R-19 to R-30 is common for floor joists. Check your local climate zone for the specific “code minimum” to ensure you’re getting the best bang for your buck.
Should I insulate my crawl space if it has a dirt floor?
Yes, but you must install a vapor barrier first. Insulating over a dirt floor without a barrier will trap moisture against your floor joists, leading to mold and wood rot. The vapor barrier is the most important part of the project.
How much can I save by insulating my crawl space myself?
DIYing this project can save you 50% to 70% compared to hiring a pro. While a professional encapsulation might cost $3,000 to $5,000, a DIYer can often achieve similar results for $500 to $1,500 in materials. Plus, you’ll save roughly 15% on your monthly energy bills!
Conclusion
Taking the time for insulating crawl space diy is an investment in the longevity of your home. At Financefyx, we believe that smart home maintenance is the best way to protect your largest asset. By sealing out moisture and trapping in heat, you’re not just lowering your bills — you’re creating a healthier environment for your family and increasing your home’s resale value.
Ready to take the next step in your energy efficiency roadmap? Check out our More energy saving tips to keep your home running at peak performance all year long. Happy crawling!
